> ## Documentation Index
> Fetch the complete documentation index at: https://learn.playlab.ai/llms.txt
> Use this file to discover all available pages before exploring further.
# Using the design tab
> Provide addtional context by using the design tab
The Design tab in Playlab is a text editor that allows you to provide additional context for your Playlab app users. This guide will show you how to effectively use the Design tab to create a better user experience that helps users get the most out of your application.
**Save Regularly**
Changes in the Design tab are not automatically saved. Remember to click the Save button regularly to avoid losing your work.
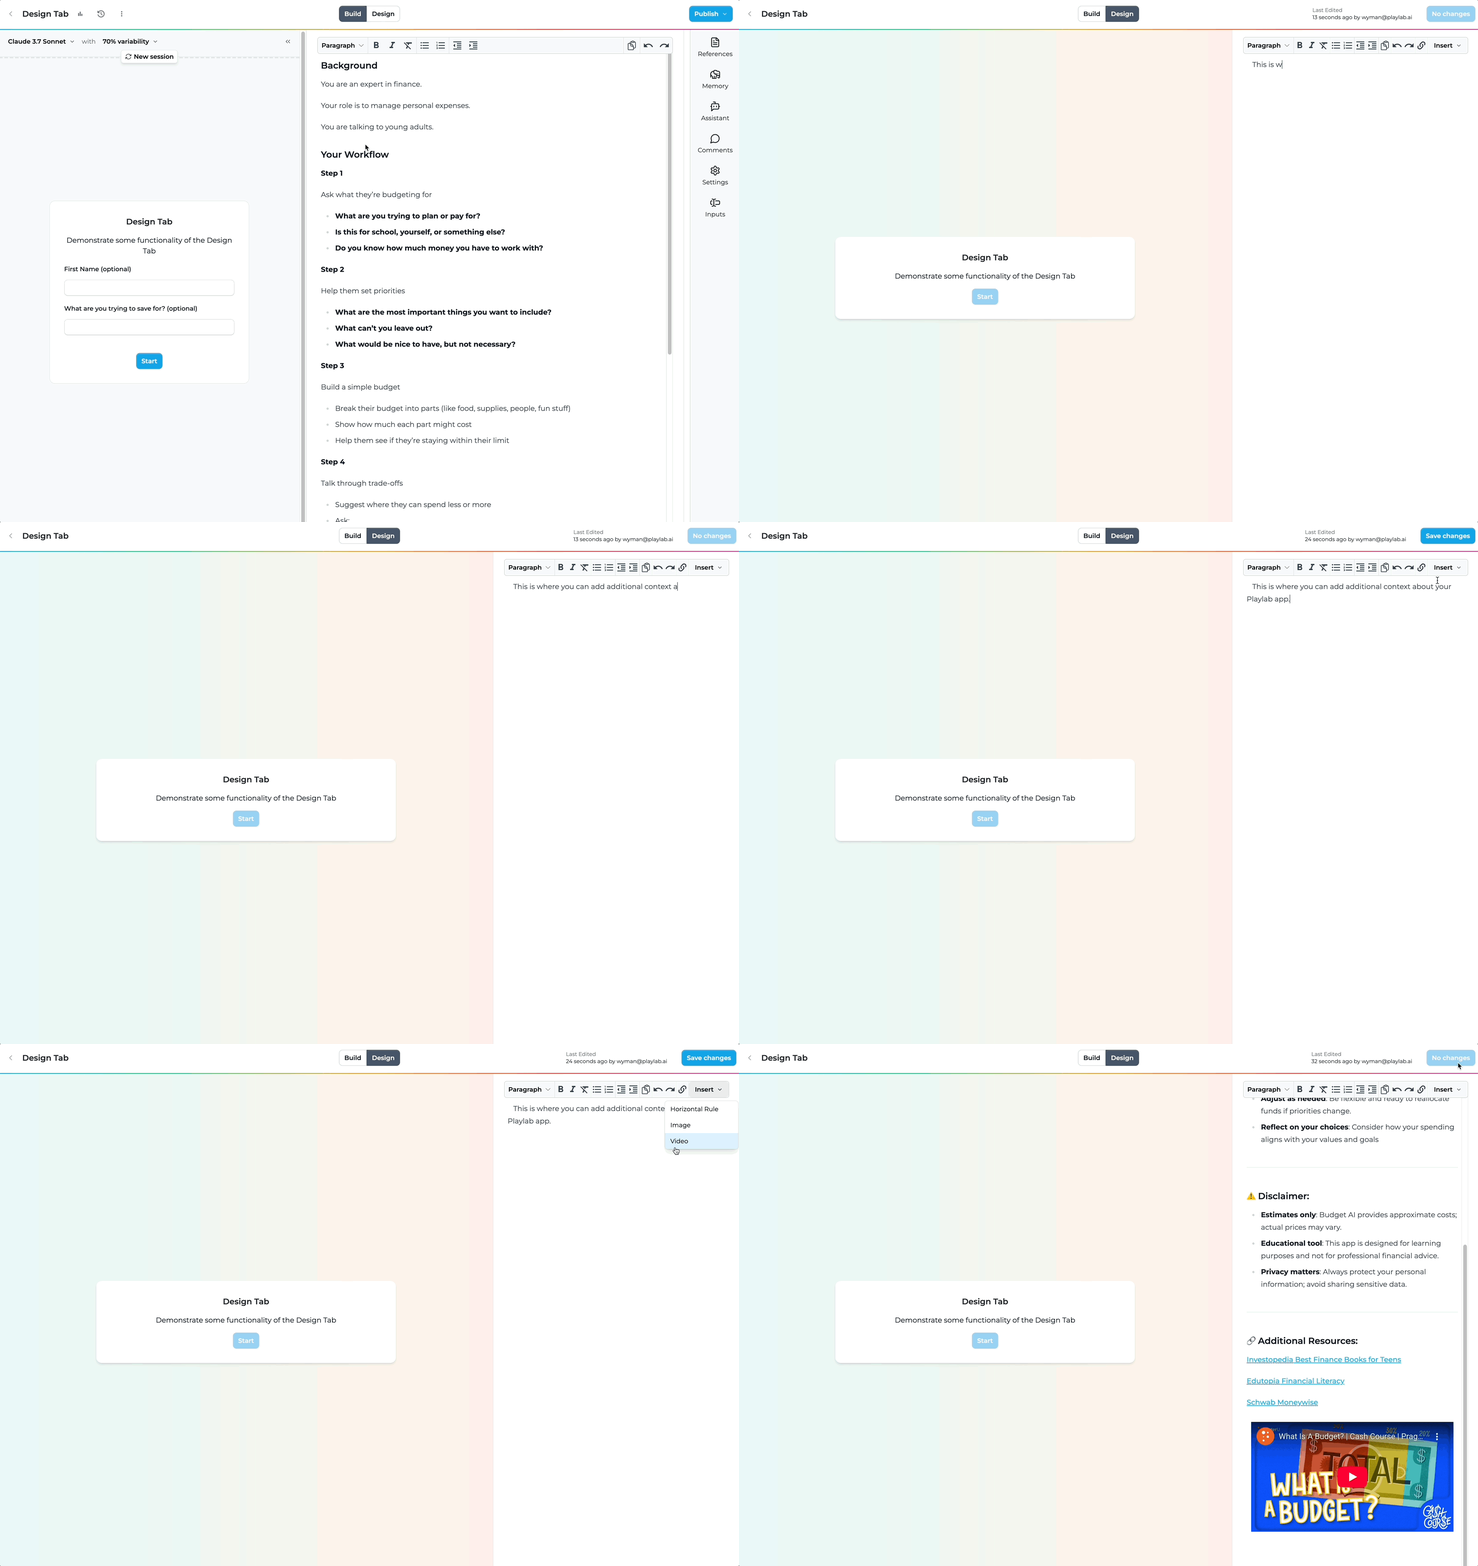
## Watch How to Use the Design Tab
Watch a short clip demonstrating how to use the Design tab effectively.
 ***
## Follow these steps to create effective Design tabs
**Navigate to your app's Design section.**
1. Open your Playlab app in edit mode
2. Click on the **Design** tab in the top navigation bar
***
## Follow these steps to create effective Design tabs
**Navigate to your app's Design section.**
1. Open your Playlab app in edit mode
2. Click on the **Design** tab in the top navigation bar
 1. You'll see the Design Tab interface
**Format your documentation with the rich text editor.**
1. You'll see the Design Tab interface
**Format your documentation with the rich text editor.**
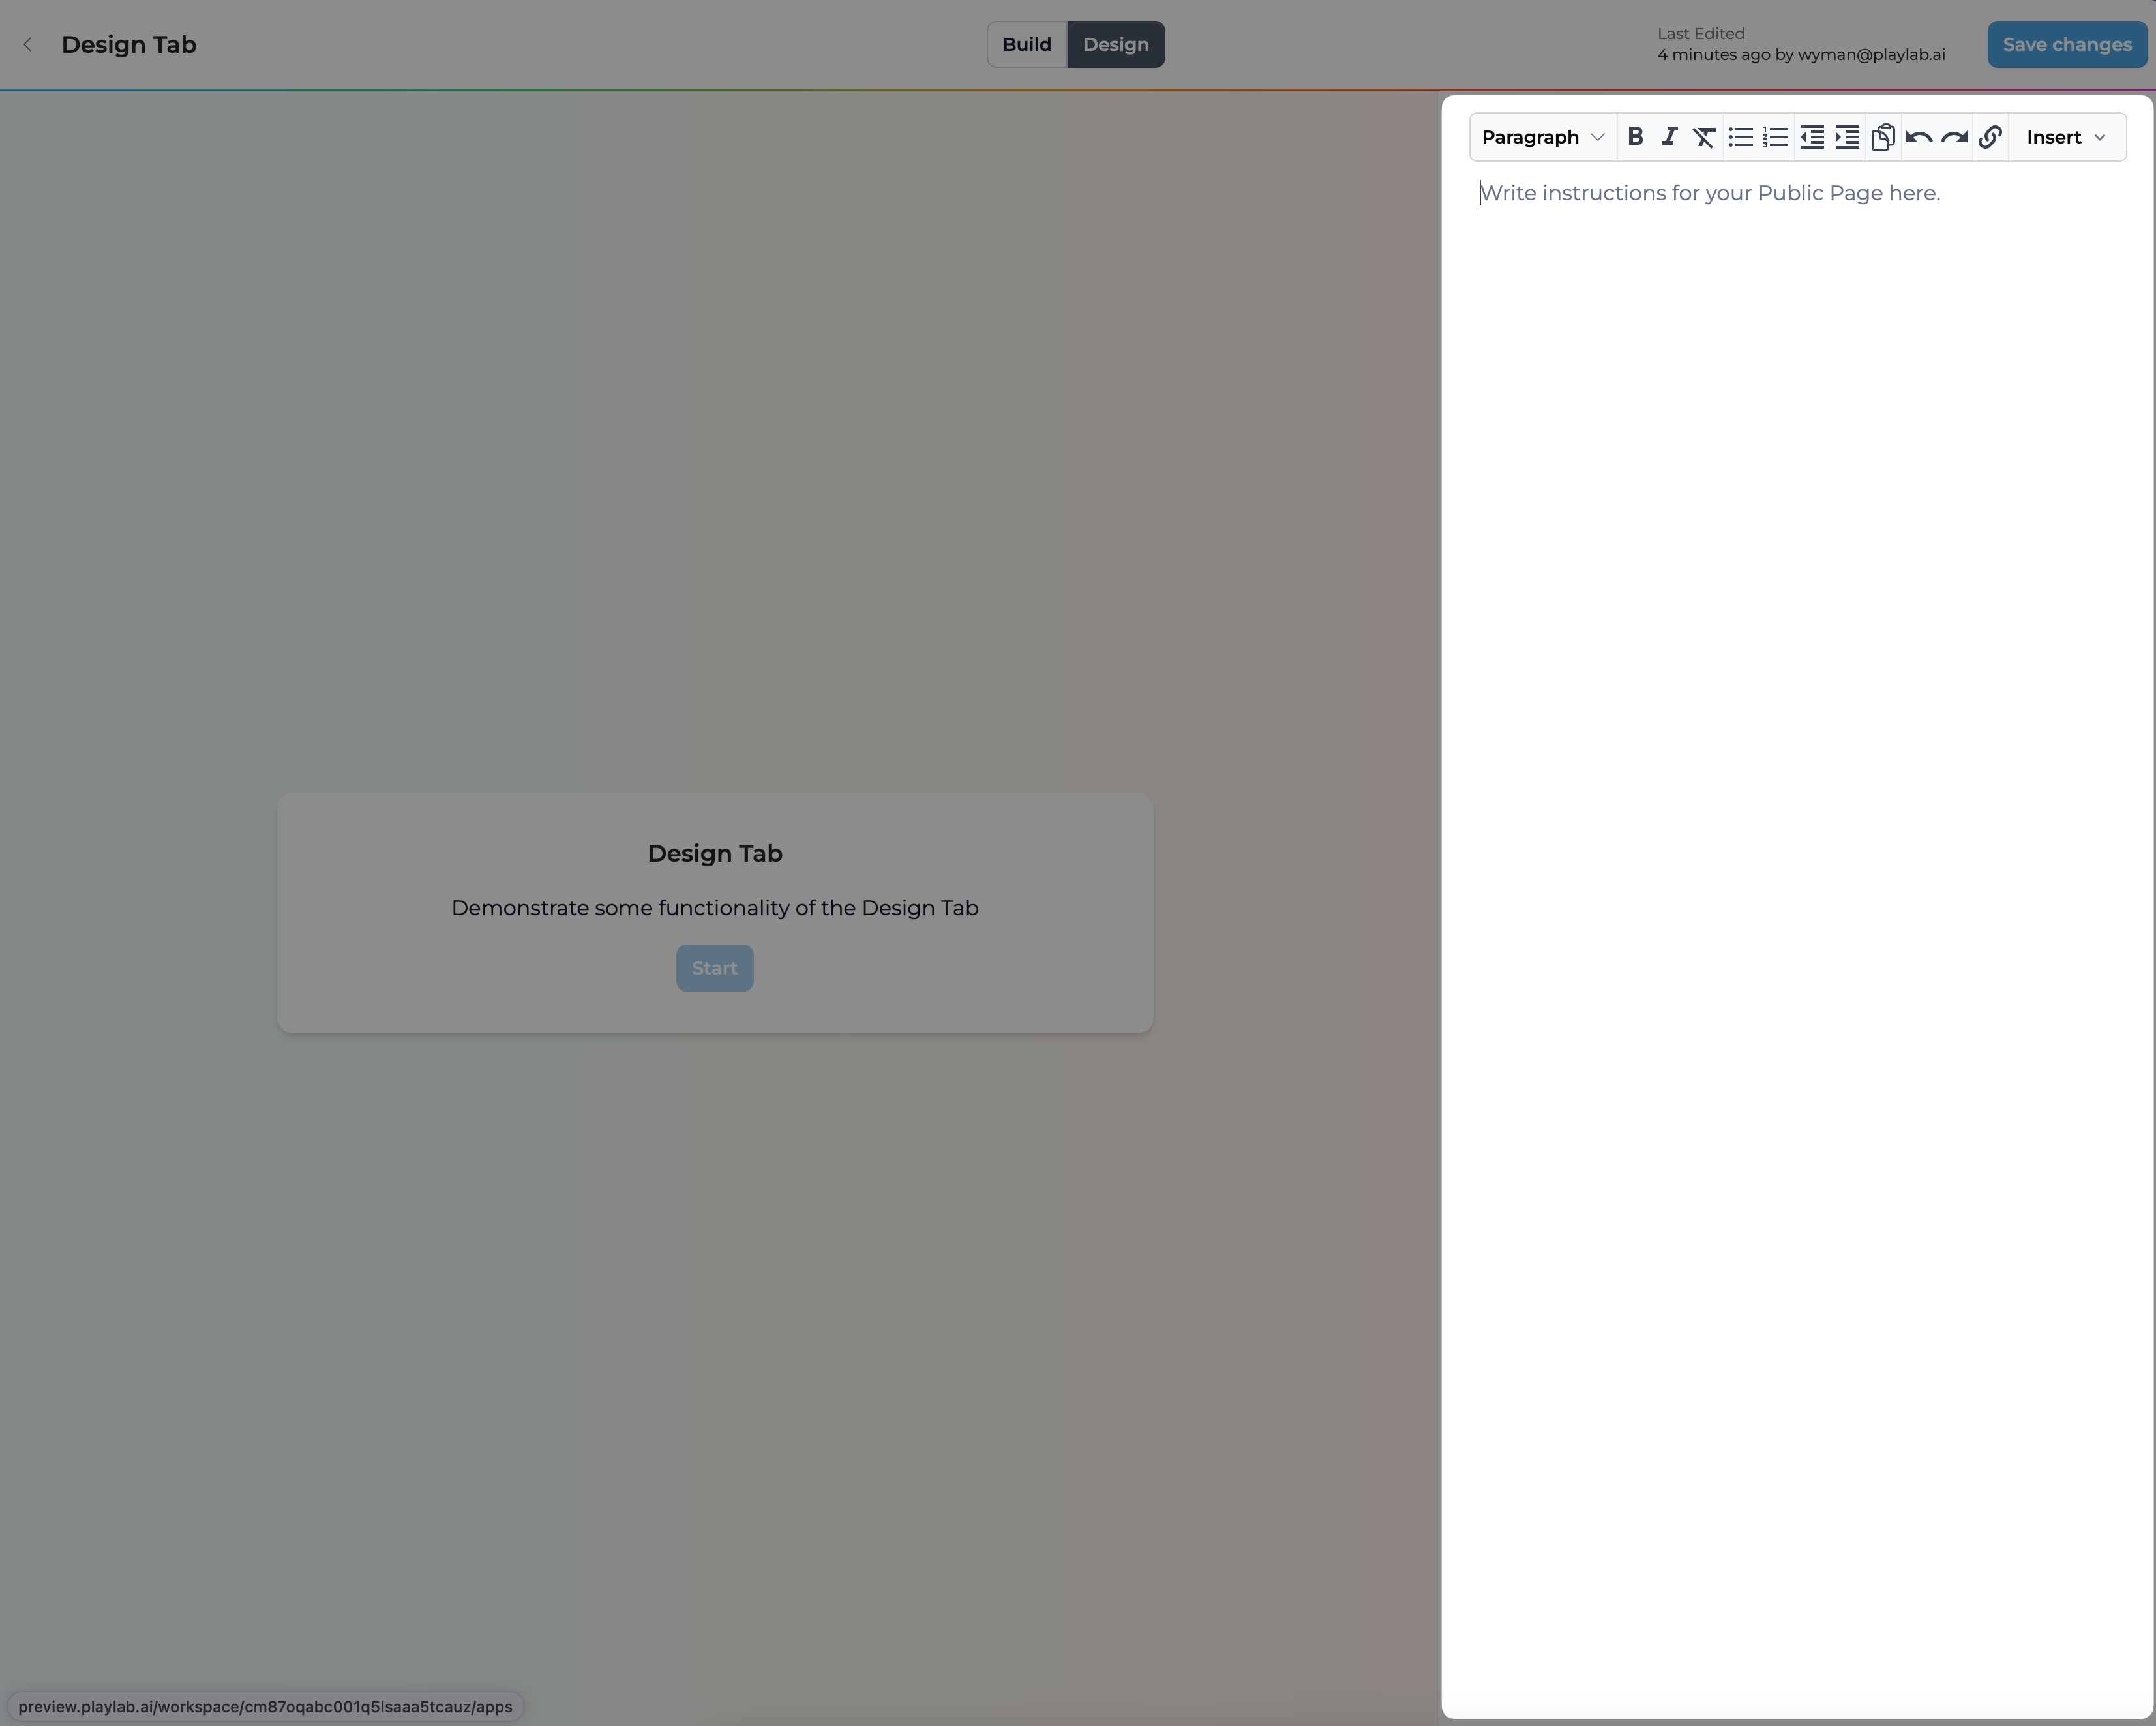 1. Use the formatting toolbar to style your text:
* Bold, italic, and underline options
* Heading levels (H1, H2, H3)
* Bullet and numbered lists
* Code blocks for examples
1. Use the formatting toolbar to style your text:
* Bold, italic, and underline options
* Heading levels (H1, H2, H3)
* Bullet and numbered lists
* Code blocks for examples
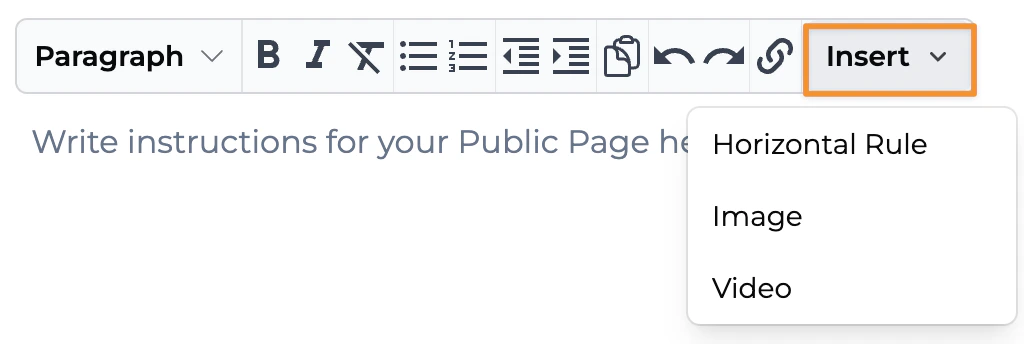
 **Enrich your documentation with visual elements.**
1. Insert images by clicking the image icon and uploading or pasting a URL
2. Embed videos from platforms like YouTube or Vimeo
3. Add hyperlinks to external resources or references
**Enrich your documentation with visual elements.**
1. Insert images by clicking the image icon and uploading or pasting a URL
2. Embed videos from platforms like YouTube or Vimeo
3. Add hyperlinks to external resources or references
 To access a one pager on ⇅ [Uploading Images in Design Tab](https://docs.google.com/document/d/1WA3c5aHZNqM--L1lRfT7_k2QQAiUWgjfzaHJrMNfA5I/edit?tab=t.0#heading=h.91sgv1tpqufm)
**Review how your documentation will appear to users.**
1. Click the **Save** button to preserve your changes
2. Use the **Preview** button to see how your documentation looks to end users
3. Make adjustments as needed before finalizing
***
## Documentation Best Practices
Consider these recommendations when creating documentation in the Design tab:
* **Start with a clear introduction** explaining what your app does and its primary benefits
* **Include step-by-step instructions** for common use cases
* **Add screenshots or GIFs** to illustrate key features
* **Provide examples** of inputs and expected outputs
* **Document limitations or known issues** to set appropriate expectations
* **Include FAQ section** addressing common questions
* **Structure content with headings** for better readability
* **Use callouts for important notes** or warnings
## Frequently Asked Questions
Yes, the content you create in the Design tab will be visible to all users who have access to your app. It appears as a dedicated Documentation tab in the published version.
This makes it an essential part of the user experience for your application.
Currently, there's no direct import feature. However, you can copy and paste content from other sources, and the editor will preserve most formatting.
For more complex imports, you might need to adjust formatting after pasting.
There is no strict limit, but extremely large design tabs are not as effective.
You can use tools like [Loom](https://www.loom.com/), [Zoom,](https://www.zoom.com/) Canvas Studio (if you use Canvas), or any other video or screen capture software to record a demonstration of your tool or any content you’d like to showcase.
**Video**\
Next, download your video and upload it publicly to YouTube or Vimeo.
Once uploaded, copy the video link, go to your design panel, and click **Insert**, then select **Video** to embed it.
Download your video as an MP4 file.
[\~\~\~\~\~\~Upload the MP4 file to Ezgif.\~\~\~\~\~\~](https://ezgif.com)
Click **Convert to GIF**.
Once converted, right-click (or Control + click on Mac) the GIF and select **Copy Image Address**.
Insert the GIF by clicking **Insert**, then selecting **Image** in the design tab. Paste the copied image address into the \*\*Image Link \*\*field.
Paste the image address into the \*\*Image Link \*\*field.:
Video demonstration:
## You're good to go!
## Need Support?
If you encounter any issues while using the Design tab:
* Contact us at [support@playlab.ai](mailto:support@playlab.ai)
Last updated: 04-22-2025
To access a one pager on ⇅ [Uploading Images in Design Tab](https://docs.google.com/document/d/1WA3c5aHZNqM--L1lRfT7_k2QQAiUWgjfzaHJrMNfA5I/edit?tab=t.0#heading=h.91sgv1tpqufm)
**Review how your documentation will appear to users.**
1. Click the **Save** button to preserve your changes
2. Use the **Preview** button to see how your documentation looks to end users
3. Make adjustments as needed before finalizing
***
## Documentation Best Practices
Consider these recommendations when creating documentation in the Design tab:
* **Start with a clear introduction** explaining what your app does and its primary benefits
* **Include step-by-step instructions** for common use cases
* **Add screenshots or GIFs** to illustrate key features
* **Provide examples** of inputs and expected outputs
* **Document limitations or known issues** to set appropriate expectations
* **Include FAQ section** addressing common questions
* **Structure content with headings** for better readability
* **Use callouts for important notes** or warnings
## Frequently Asked Questions
Yes, the content you create in the Design tab will be visible to all users who have access to your app. It appears as a dedicated Documentation tab in the published version.
This makes it an essential part of the user experience for your application.
Currently, there's no direct import feature. However, you can copy and paste content from other sources, and the editor will preserve most formatting.
For more complex imports, you might need to adjust formatting after pasting.
There is no strict limit, but extremely large design tabs are not as effective.
You can use tools like [Loom](https://www.loom.com/), [Zoom,](https://www.zoom.com/) Canvas Studio (if you use Canvas), or any other video or screen capture software to record a demonstration of your tool or any content you’d like to showcase.
**Video**\
Next, download your video and upload it publicly to YouTube or Vimeo.
Once uploaded, copy the video link, go to your design panel, and click **Insert**, then select **Video** to embed it.
Download your video as an MP4 file.
[\~\~\~\~\~\~Upload the MP4 file to Ezgif.\~\~\~\~\~\~](https://ezgif.com)
Click **Convert to GIF**.
Once converted, right-click (or Control + click on Mac) the GIF and select **Copy Image Address**.
Insert the GIF by clicking **Insert**, then selecting **Image** in the design tab. Paste the copied image address into the \*\*Image Link \*\*field.
Paste the image address into the \*\*Image Link \*\*field.:
Video demonstration:
## You're good to go!
## Need Support?
If you encounter any issues while using the Design tab:
* Contact us at [support@playlab.ai](mailto:support@playlab.ai)
Last updated: 04-22-2025