> ## Documentation Index
> Fetch the complete documentation index at: https://learn.playlab.ai/llms.txt
> Use this file to discover all available pages before exploring further.
# Creating and managing a workspace
> How to set up a workspace, configure building permissions, add members, and curate apps.
Workspaces are the home for a class, team, or group inside an organization. They hold members, apps, activity, and the building permissions that govern what members can do. Creating one takes a minute. Managing one well is the work that pays off all year.
**Workspace creation requirements**
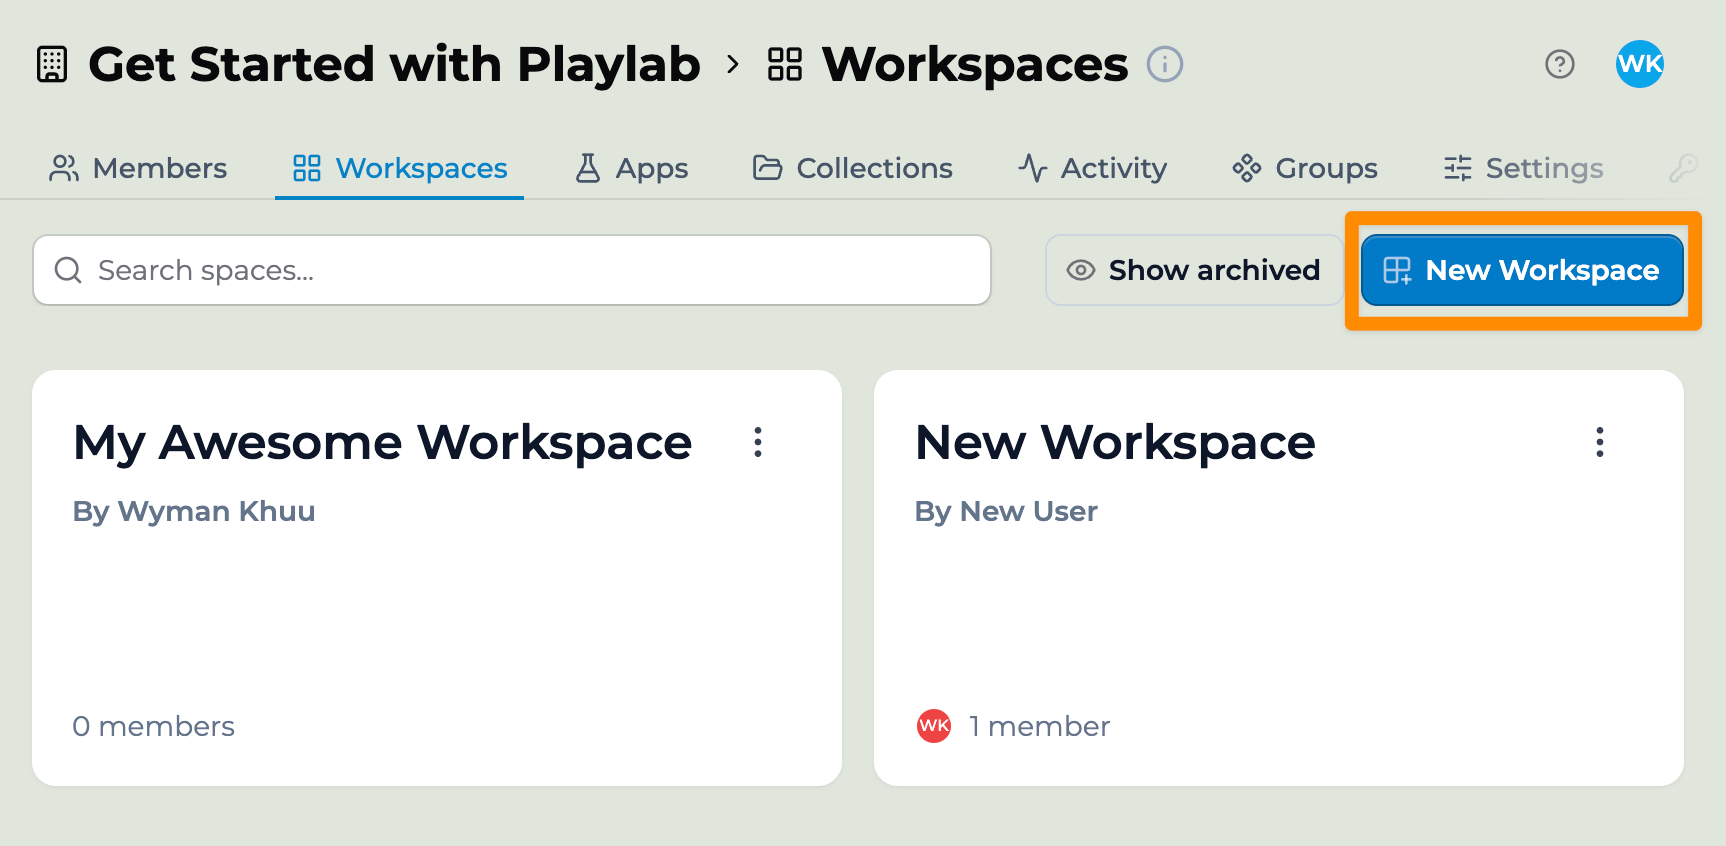
You need to be an org member with workspace creation permission. If you do not see the **New Workspace** button on your org dashboard, ask your org admin.
## How to create a workspace
The dashboard lists your existing workspaces, apps, collections, and members.
The button is in the top right of the Workspaces tab.
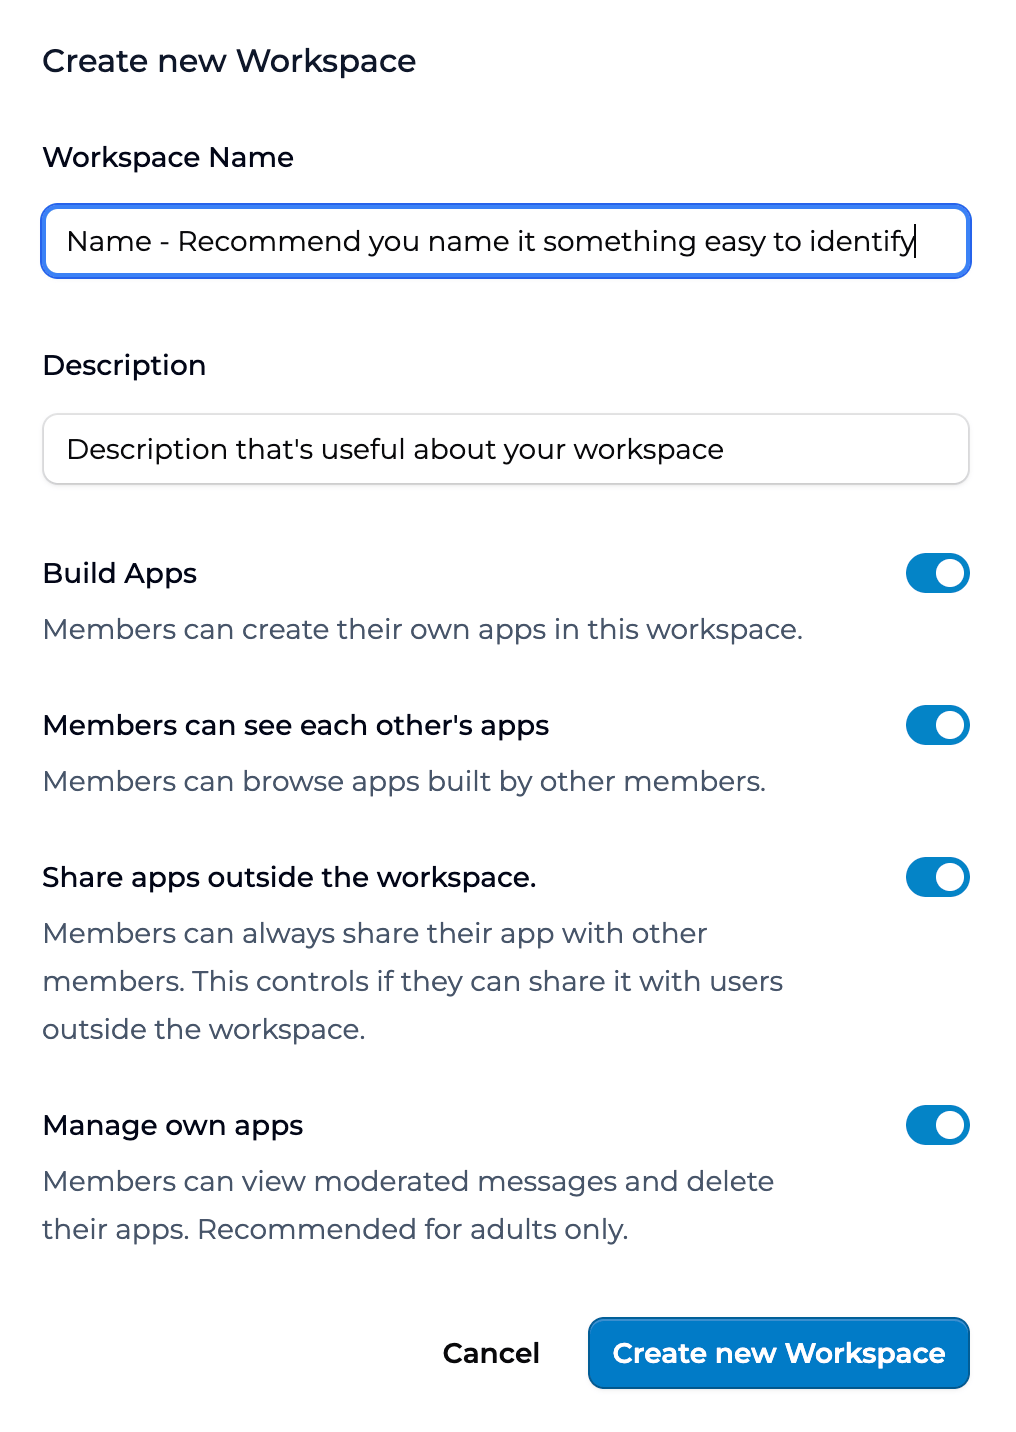
 The name shows up in members' dashboards. Pick something easy to identify. The description helps you and your members remember what the workspace is for.
Review the four toggles. See [Building permissions](#building-permissions) below for what each one does.
You land on the workspace home page with empty Members and Apps tabs ready to fill.
The name shows up in members' dashboards. Pick something easy to identify. The description helps you and your members remember what the workspace is for.
Review the four toggles. See [Building permissions](#building-permissions) below for what each one does.
You land on the workspace home page with empty Members and Apps tabs ready to fill.
 ## Workspace roles
A workspace has three roles:
**Owner**
The workspace creator by default. Can do everything — invite members, manage apps, change permissions and settings — plus delete the workspace. Ownership can be transferred, and a workspace can have more than one Owner.
**Facilitator**
Day-to-day management without the ability to delete the workspace. Can manage participants and apps, view and export activity and insights, and review moderated content. Best for co-teachers and admin support.
**Participant**
The default role for invited people. Can use the apps shared in the workspace and, depending on building permissions, may be able to build their own.
For the full role-to-permission matrix, see [Workspace roles and permissions](/features/Workspace%20Roles%20and%20Permissions). For org-level roles that span workspaces, see [Org permissions and roles](/features/Org%20Permissions%20and%20Roles).
## Adding members to a workspace
Two paths:
1. **Add Members.** From the Members tab, click **Add Members**, type or paste emails, set permissions, and send. Recipients get an email invite.
2. **Create Invite Link.** From the same tab, click **Create Invite Link**. Pick the permission level the link grants. Anyone who clicks the link joins with that permission.
For full instructions, see [Adding members to a workspace](/getstarted/Adding%20Members%20to%20your%20Workspace).
## Adding apps to a workspace
You can add existing apps to a workspace as well as create new ones inside it.
To create a new app, go to the Apps tab and click **New App**. The app is created inside this workspace.
To add an existing app, go to the Apps tab and click **Add Apps**. Search for an app you have access to (yours, shared with you, or part of a Collection you have added). Pick it and confirm. The app appears in the workspace and members can use it.
For the deeper guide on cross-workspace use, see [Using an app across multiple classes](/features/Cross-Workspace%20App%20Use).
## Building permissions
The four toggles you set on workspace creation are:
1. **Build Apps.** Members can create their own apps in this workspace. Turn on for classes where students are creating apps as part of the curriculum.
2. **Members can see each other's apps.** Members can browse apps built by other members. Useful when collaboration is part of the learning; off when individual work matters.
3. **Share apps outside the workspace.** Members can always share their app with other members inside the workspace — this toggle controls whether they can also share it with users *outside* the workspace.
4. **Manage own apps.** Members can view moderated messages and delete their own apps. **Recommended for adults only.**
You can change these any time from the workspace settings. For more, see [Workspace building permissions](/getstarted/Workspace%20Building%20Permissions).
## Organizing your workspaces
Common patterns:
**One workspace per class section.** A teacher with three sections of Algebra 1 creates three workspaces. Activity stays segmented. Each section sees only its own work.
**One workspace per project or unit.** A multi-week PBL unit gets its own workspace. Apps and activity for that unit live together.
**One workspace per grade level.** A school admin creates a workspace per grade. Teachers in that grade are Members. Apps relevant to the grade are added.
**One workspace per cohort.** Useful in higher ed and adult learning where cohorts cycle through programs.
Pick the pattern that matches how you already group students. Workspaces work best when their boundaries match a real grouping you use anyway.
## Best practices
A few things teachers have asked about and that have worked:
Set conservative building permissions to start. Turning a toggle on later is easy. Walking back student access after they have built apps is harder.
Archive workspaces at the end of a unit or year — the workspace stops being active in members' dashboards while activity history stays available to admins.
## Key points
* Workspaces are containers for a class, team, or project
* Four toggles set what members can do — review them on creation; change anytime
* Add members through org search, email invite, or invite link
## FAQ
Yes. From the workspace settings, scroll to the bottom and click **Delete Workspace**. Activity history is retained for the org admin even after deletion. Apps owned inside the workspace are reassigned to the workspace owner.
Yes. The change applies going forward. Existing apps stay where they are. Members keep what they had built up to the change.
They are removed from all workspaces in that org. Their apps and activity stay in place. The workspace owner sees the apps as orphaned and can reassign or archive them.
Partner orgs have a generous default ceiling. If you hit a limit, your org admin can request more from your Learning Partner.
From workspace settings, click Archive. The workspace becomes read-only for members. Activity history stays accessible to admins.
Yes. From the org Members tab, select multiple members with checkboxes and use Move to Workspace. The same flow works for removing in bulk.
***
Last updated: 06-17-2026
Contact us at [support@playlab.ai](mailto:support@playlab.ai)
## Workspace roles
A workspace has three roles:
**Owner**
The workspace creator by default. Can do everything — invite members, manage apps, change permissions and settings — plus delete the workspace. Ownership can be transferred, and a workspace can have more than one Owner.
**Facilitator**
Day-to-day management without the ability to delete the workspace. Can manage participants and apps, view and export activity and insights, and review moderated content. Best for co-teachers and admin support.
**Participant**
The default role for invited people. Can use the apps shared in the workspace and, depending on building permissions, may be able to build their own.
For the full role-to-permission matrix, see [Workspace roles and permissions](/features/Workspace%20Roles%20and%20Permissions). For org-level roles that span workspaces, see [Org permissions and roles](/features/Org%20Permissions%20and%20Roles).
## Adding members to a workspace
Two paths:
1. **Add Members.** From the Members tab, click **Add Members**, type or paste emails, set permissions, and send. Recipients get an email invite.
2. **Create Invite Link.** From the same tab, click **Create Invite Link**. Pick the permission level the link grants. Anyone who clicks the link joins with that permission.
For full instructions, see [Adding members to a workspace](/getstarted/Adding%20Members%20to%20your%20Workspace).
## Adding apps to a workspace
You can add existing apps to a workspace as well as create new ones inside it.
To create a new app, go to the Apps tab and click **New App**. The app is created inside this workspace.
To add an existing app, go to the Apps tab and click **Add Apps**. Search for an app you have access to (yours, shared with you, or part of a Collection you have added). Pick it and confirm. The app appears in the workspace and members can use it.
For the deeper guide on cross-workspace use, see [Using an app across multiple classes](/features/Cross-Workspace%20App%20Use).
## Building permissions
The four toggles you set on workspace creation are:
1. **Build Apps.** Members can create their own apps in this workspace. Turn on for classes where students are creating apps as part of the curriculum.
2. **Members can see each other's apps.** Members can browse apps built by other members. Useful when collaboration is part of the learning; off when individual work matters.
3. **Share apps outside the workspace.** Members can always share their app with other members inside the workspace — this toggle controls whether they can also share it with users *outside* the workspace.
4. **Manage own apps.** Members can view moderated messages and delete their own apps. **Recommended for adults only.**
You can change these any time from the workspace settings. For more, see [Workspace building permissions](/getstarted/Workspace%20Building%20Permissions).
## Organizing your workspaces
Common patterns:
**One workspace per class section.** A teacher with three sections of Algebra 1 creates three workspaces. Activity stays segmented. Each section sees only its own work.
**One workspace per project or unit.** A multi-week PBL unit gets its own workspace. Apps and activity for that unit live together.
**One workspace per grade level.** A school admin creates a workspace per grade. Teachers in that grade are Members. Apps relevant to the grade are added.
**One workspace per cohort.** Useful in higher ed and adult learning where cohorts cycle through programs.
Pick the pattern that matches how you already group students. Workspaces work best when their boundaries match a real grouping you use anyway.
## Best practices
A few things teachers have asked about and that have worked:
Set conservative building permissions to start. Turning a toggle on later is easy. Walking back student access after they have built apps is harder.
Archive workspaces at the end of a unit or year — the workspace stops being active in members' dashboards while activity history stays available to admins.
## Key points
* Workspaces are containers for a class, team, or project
* Four toggles set what members can do — review them on creation; change anytime
* Add members through org search, email invite, or invite link
## FAQ
Yes. From the workspace settings, scroll to the bottom and click **Delete Workspace**. Activity history is retained for the org admin even after deletion. Apps owned inside the workspace are reassigned to the workspace owner.
Yes. The change applies going forward. Existing apps stay where they are. Members keep what they had built up to the change.
They are removed from all workspaces in that org. Their apps and activity stay in place. The workspace owner sees the apps as orphaned and can reassign or archive them.
Partner orgs have a generous default ceiling. If you hit a limit, your org admin can request more from your Learning Partner.
From workspace settings, click Archive. The workspace becomes read-only for members. Activity history stays accessible to admins.
Yes. From the org Members tab, select multiple members with checkboxes and use Move to Workspace. The same flow works for removing in bulk.
***
Last updated: 06-17-2026
Contact us at [support@playlab.ai](mailto:support@playlab.ai)